How to use a bootable flash drive of SDC PRO?
to diagnose your customers' HDDs or SSDs without disassembly
Prerequisites:
1. Have created a bootable USB drive with Rufus
2. Have created an SDC PRO account
Method 1: Diagnosing an offline computer
- Connect the USB drive created with Rufus to a Windows OS
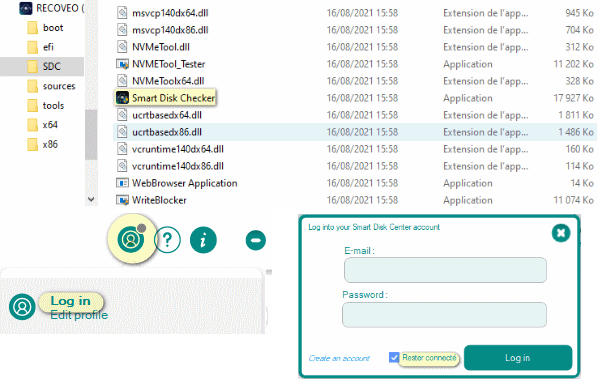
- Open the “SDC” folder and run the Smart Disk Checker.exe file
- Once the software has started, click on the connection icon (top right), then click on “Connect”.
- Fill in your login and password, check “Stay logged in” and then click on “Log in”.
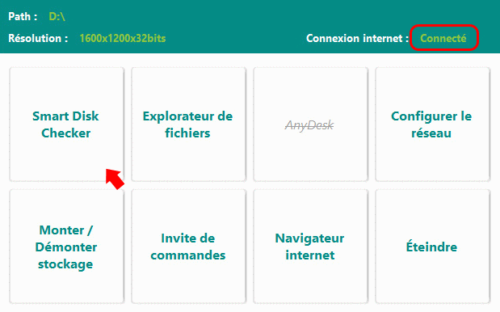
- Boot from the USB drive to the PC containing the disk to be diagnosed and click on the “Smart Disk Checker” button.
The configuration file will be created immediately in the USB flash drive.
To load the reports created from a PC not connected to the Internet, run the executable file of the USB drive on a Windows connected to the Internet.
To load the reports created from a PC not connected to the Internet, run the executable file of the USB drive on a Windows connected to the Internet.

Method 2: Diagnosing a PC connected to the Internet with an RJ45 cable

- Boot from the USB flash drive on a PC connected to the internet with an RJ45 network cable
- Once on the home panel, check that the internet connection is working properly (internet connection: Connected).
- Click on the “Smart Disk Checker” button and wait for the software to launch.
- Click on the login icon (top right), then “Login”.
- Fill in your login and password, check “Stay logged in” then “Login”.
The configuration file will be created on the flash drive.
The diagnostic reports will be uploaded and viewable in your SDC Center account.
Run the ISO’s built-in browser to connect.
The diagnostic reports will be uploaded and viewable in your SDC Center account.
Run the ISO’s built-in browser to connect.